
How to Reconnect Epson SureColor P700 Printer to WiFi? (Steps Guide)
June 6, 2025

No matter how advanced your printer is, users can run into problems with it. Sometimes, even when connected to your PC or smartphone, the printer might not function correctly due to several issues. Similarly, with your Epson SureColor P700 printer, you can get the same problem for numerous reasons, such as the printer being inactive for a long time, a network connection or communication issue, changing settings unknowingly, etc., to name a few.
But the good news is that the issue can be resolved quickly with the help of the right solutions. This issue can be resolved quickly with the right solutions, and I am going to share the most effective methods I have learned in my years of experience. Make sure to read the whole content thoroughly, learn the solutions, and apply them to get your printer working smoothly.
Epson SureColor P700 Printer WiFi Connection Methods
There are two suitable methods to connect your Epson printer to the WiFi network. Here, you will learn how to connect the printer directly to the router with the WPS method or using the Epson iPrint app on your smartphone.
Method 1: Using WiFi Protected Setup (WPS)
The WPS method is one of the most suitable ways to directly connect your printer to WiFi. Here are the steps you can follow to establish the proper connection.
- For the first step, you need to turn on your Epson SureColor P700 printer and prepare it for connection.
- After that, go to your WiFi router and hold the WPS button for a few seconds until the security light starts flashing. (If your router lacks a visible WPS button, then refer to its documentation for guidance.)

- On your printer, keep pressing the WiFi button until the WiFi light starts flashing.
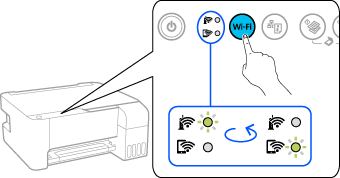
- Wait for a while until the process ends. (Once the connection process is complete, the WiFi light will be on.)
Method 2: WiFi Connection via Epson iPrint App
You can connect your Epson SureColor printer to WiFi using your smartphone. Follow the steps to complete the connection.
- Start by downloading and opening the Epson iPrint app on your smartphone.
- After that, you need to tap on the “Printer is not selected. Tap here to select a printer” option.
- Go to the Local tab and select your printer’s name. (If your printer’s name does not appear on the screen, then ensure that the printer and mobile device are connected to the same network and select Search again. If the printer still does not appear on the screen, then manually connect to it from the Manual IP tab or tap WiFi Direct Setup.)
- In order to manually add your printer to your network, tap on the Manual IP tab.
- Next, select Add, type the IP address for the printer, and tap Done.
- Now, you can use the printer’s functions using the app.
The Process of Epson Printer Setup on WiFi
If you want to complete the Epson SureColor P700 printer setup on a computer via WiFi from scratch, then follow the steps below.
- You need to insert the provided CD into your computer. (You can also visit the official Epson website to download the software.)
- Then, specify your preferred language using the Next or Continue option.
- After that, you should agree to the license agreement to move forward with the software installation process.
- In the next window, select Install to begin the installation process.

- Now, the software installation process will begin; it can take several minutes to complete.
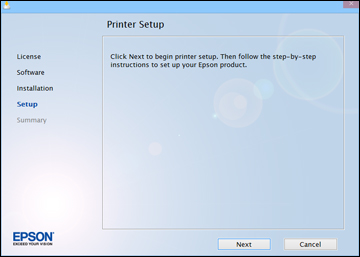
- When you see the Printer Setup screen, select the Next button to proceed with setting up the printer on your wireless network.
- When the “Select your connection” page shows up on the screen, click on the “Wireless connection” radio button and select the Next option.
- Also, you are required to choose the “Set up printer for the first time” option and click Next once again.

- If your printer does not connect to the network automatically, then a follow-up screen will appear; you need to choose the “WiFi Protected Setup” or “using USB cable” option. (Earlier you have learned the process of WiFi protected setup.)

- After that, follow the further prompts to complete the printer connection to WiFi and finish the setup.
Wrap Up
Connecting your Epson printer to WiFi is necessary to complete its setup and use its functions. Here, you have gathered multiple methods "How to connect your Epson SureColor P700 printer to WiFi" and complete the setup on a computer or smartphone. These methods will help you set up and start using your printer seamlessly. Moreover, it is always good to look for more help if necessary.

Frequently Asked Questions
Question
What is the best way to connect Epson SureColor P700 printer to WiFi?
Below is the quick procedure you can follow if you want to connect the printer to WiFi.
- On the home screen of your printer, tap on the WiFi option.
- Then, select the WiFi Direct option.
- Next, you need to choose the Start Setup option.
- Tap on the Start
Setup option once again.
- After that, you should check the SSID and password
on the printer’s control panel.
- Choose the SSID network name shown on your device.
- Type the correct password, and the connection
process will be complete.
Question
Why Is My Epson Printer Not Connecting to a Wireless Network?
Some problems with your device, network, or PC are stopping the printer from connecting to your network. Below are some common reasons for the issue.
● Maybe the printer and the wireless router are far
from each other.
● You are following the incorrect connection
process for your printer.
● Your printer is unable to connect to your
wireless network.
● The router is not recognizing your printer.
● Either your printer or your computer is facing
some technical glitches, etc.
Question
Can I use my Epson printer without connecting to a network?
Yes, you can. If you
want to use your printer without connecting to a network, you can print via
WiFi Direct and a USB connection. Also, you can use the Epson Smart Panel app
to connect a smartphone directly to your printer and continue printing. You can
choose any of these connection options at your convenience.
Enter your Comments Here: